Zum Inhalt springen

Das schmuffligste Blog der Welt

Sinn und Unsinn der passiert

Archiv

Kategorie: Linux

From the start of playing Eve Online this „Autopilot“ problem was getting on my nerves. If you have large distances to travel and activate the autopilot, it does not warp you to zero (0) of the jumpgate, but you end up 2.000m, 3.000m or even 5.000m away from it. So in a slow ship you have massive travel time to calculate in. Of course you could sit there and click the Afterburner icon etc, but where is the sense in flying Autopilot then?

The solution to this actually quite simple. Get an autoclicker tool. As I am using Linux, this tool is XClicker. Easy to use, available in several packages (Appimage, deb, etc) and very easy to configure. Just install, set the coordinates for the „Jump“ button and hit F8. Tadaaaa!

This will also „dock“ you at your station,as the „Dock“ button is at the same position.

Some of us are still using the really old FritzCard PCI under recent Ubuntu Linux.
As the fcpci module is not being developed anymore (it seems), the last available version is for Linux kernel 4.4.0 and can be found here:

https://belug.de/~lutz/pub/fcpci/fritz-fcpci-4.4.0.tar.bz2
(local mirror: fritz-fcpci-4.4.0)

However, this won’t compile under the standard Linux kernel that is shipped with latest Ubuntu 18.04.5 LTS, which is 4.15.0-122. It will fail with an error like this:

In file included from /usr/local/src/fcpci-4.4.0/src/main.c:24:0:
./arch/x86/include/asm/uaccess.h:30:27: error: unknown type name ‘mm_segment_t’; did you mean ‘apm_event_t’?
static inline void set_fs(mm_segment_t fs)
^~~~~~~~~~~~
apm_event_t

But relax, the task can be achieved by editing the sources a little. Here is how.

Steps:

  1. Download the sources from above and extract to /usr/local/src or somewhere else
  2. Make sure you got the build-essental package installed:
    sudo apt-get install build-essential
  3. Edit the file main.c and go to line 24.
    Replace #include <asm/uaccess.h>
    with #include <linux/uaccess.h>
  4. Now build the module with „make“ and install with „sudo make install“
  5. Check with „modinfo fcpci“ if the module has been installed correctly. It should show something like this:filename: /lib/modules/4.15.0-122-generic/kernel/extras/fcpci.ko
    description: CAPI4Linux: Driver for AVM FRITZ!Card PCI
    license: Proprietary
    srcversion: 9274AE9170599A8E7BC82F1
    alias: pci:v00001244d00000E00sv*sd*bc*sc*i*
    alias: pci:v00001244d00000A00sv*sd*bc*sc*i*
    depends: kernelcapi
    retpoline: Y
    name: fcpci
    vermagic: 4.15.0-122-generic SMP mod_unload
  6. To use the module and capi20, add those modules to /etc/modules:
    echo -e „fcpci\ncapidrv“ >> /etc/modules
  7. Reboot and check if the modules are loaded with „lsmod|grep capi“, it should show:capidrv 36864 0
    isdn 147456 1 capidrv
    kernelcapi 40960 2 capidrv,fcpci
  8. Thats it. „capiinfo“ should now also find your controller and show it. Extract:capi20.c: 164 CapiDebug():[capi20_isinstalled]: standard loop – module: standard
    capi20.c: 164 CapiDebug():[capi20_isinstalled]: capi_fd: 4
    Number of Controllers : 1
    Controller 1:
    Manufacturer: AVM GmbH
    CAPI Version: 2.0
    Manufacturer Version: 3.11-07 (49.23)
    Serial Number: 1000001
    BChannels: 2
    Global Options: 0x00000039
    internal controller supported
    DTMF supported
    Supplementary Services supported
    channel allocation supported (leased lines)
    B1 protocols support: 0x4000011f capi20.c: 164 CapiDebug():[capi20_isinstalled]: standard loop – module: standard
    capi20.c: 164 CapiDebug():[capi20_isinstalled]: capi_fd: 4
    Number of Controllers : 1
    Controller 1:
    Manufacturer: AVM GmbH
    CAPI Version: 2.0
    Manufacturer Version: 3.11-07 (49.23)
    Serial Number: 1000001
    BChannels: 2
    Global Options: 0x00000039
    internal controller supported
    DTMF supported
    Supplementary Services supported
    channel allocation supported (leased lines)
    B1 protocols support: 0x4000011f

This works up to 4.17.19  kernels as well, but to my knowledge not in any kernel later than 4.17.19, as to my understanding proc file operations (proc_fops) have changed.

TL;DR: Upgrading Kernel to 4.16.1 and changing settings in the BIOS fixed it for me.

Recently I upgraded my Workstation from an old Athlon 5370 on MSI AM1I to a Ryzen 5 2400G on a Gigabyte AB350M-DS3H.
Sadly I had no idea of the trouble I was getting into with Linux. My Ubuntu 16.04.3 was running the stock 4.4.0 Kernel, for some strange reason the kernel would not boot completely once in a while. It was stuck during kernel load without any message whatsoever. Pressing reset and giving it another try worked most of the time. Rarely I had to switch everything off and try again.

Using 4.4.0 everything seemed to be running stable, but alas, no APU hardware acceleration! Compiz sucked a lot of CPU power and Youtube videos even more. Lucky enough, 4.16 was being released soon after I bought the new hardware. Strangely I encountered the same kernel boot lockups almost every time I booted. But what was even worse was the constant freeze/lockup after the system booted. Using the desktop worked for some time, but as soon as APU power was required (Youtube, gaming, …) the system just locked up with no kernel message whatsoever being locked. Hard to debug! So first I was suspicious about a hardware defect. Reboot and into Memtest86+. Running for hours my 16GB DDR4 @ 3200MHz with no errors logged. Guess that was not it. Then I installed Windows 10 with newest chipset and graphic drivers on a spare SSD and started playing some games. Aha! Once in a while a game dropped back to the desktop. Something MUST be wrong. I turned down the memory frequency to around 3000MHz and the problems stopped. Could play for hours. So hardware should be fine. Back to linux.
Again, lockups after the the first few minutes. Google spat alot of hints on older (the first without APU) Ryzens out, disable C6 state, rebuild Kernel with „Offload RCU callback processing from boot-selected CPUs“ and set cores as kernel switch, integrate bleeding edge PPA with the hottest, newest, whatever LLVM/Mesa/whatever  packages. Nothing worked. Still lockups.
So I started to think about the mainboard. Locked into dmesg and opened tickets with Gigabyte Support to have them fix the ACPI and IOMMU errors I encountered during bootup:

[ 0.000000] ACPI BIOS Error (bug): Failure creating [\_SB.SMIC], AE_ALREADY_EXISTS (20180105/dswload-380)
[ 0.000000] ACPI Error: AE_ALREADY_EXISTS, During name lookup/catalog (20180105/psobject-252)
[ 0.000000] ACPI Error: AE_ALREADY_EXISTS, (SSDT: AMD PT) while loading table (20180105/tbxfload-228)
[ 0.000000] ACPI Error: 1 table load failures, 7 successful (20180105/tbxfload-246)
[ 0.061188] ACPI BIOS Error (bug): Failure looking up [\PTOS], AE_NOT_FOUND (20180105/psargs-364)
[ 0.061188] No Local Variables are initialized for Method [„\“ ]
[ 0.061188] No Arguments are initialized for method [„\“ ]
[ 0.061188] ACPI Error: Method parse/execution failed \, AE_NOT_FOUND (20180105/psparse-550)

The answer was a quick and short „in Windows 7/10 this error does not show up. Linux is not supported.“, which I interpreted as „GO FUCK YOURSELF, ASSHOLE! HAHAHAHAHA!“
Curse you, Gigabyte! Last product I ever buy from you. Blacklisted for life!
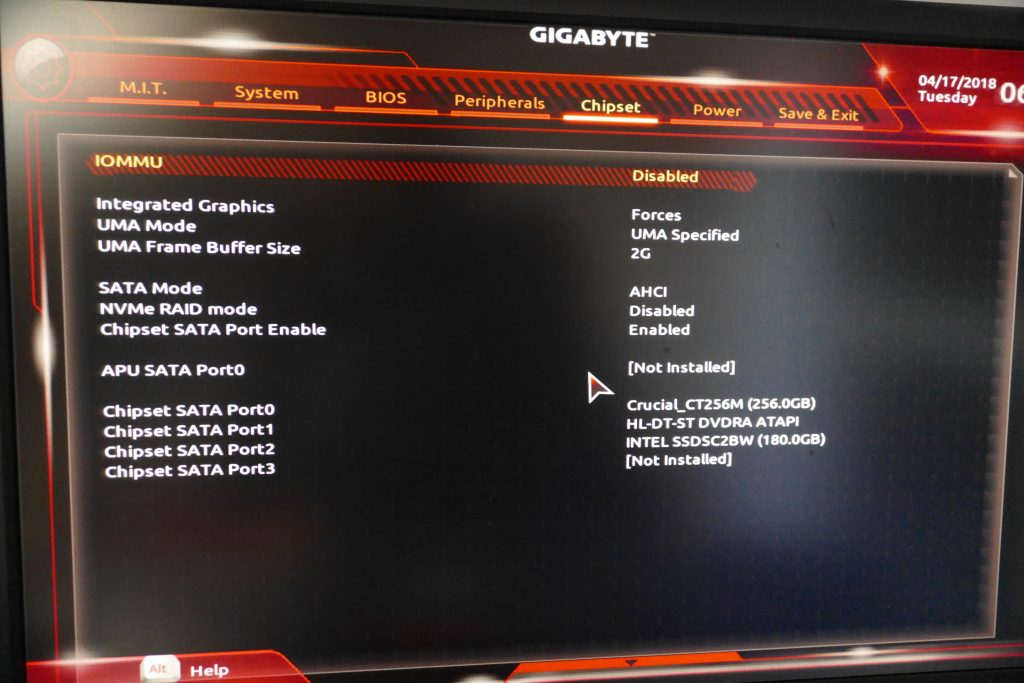
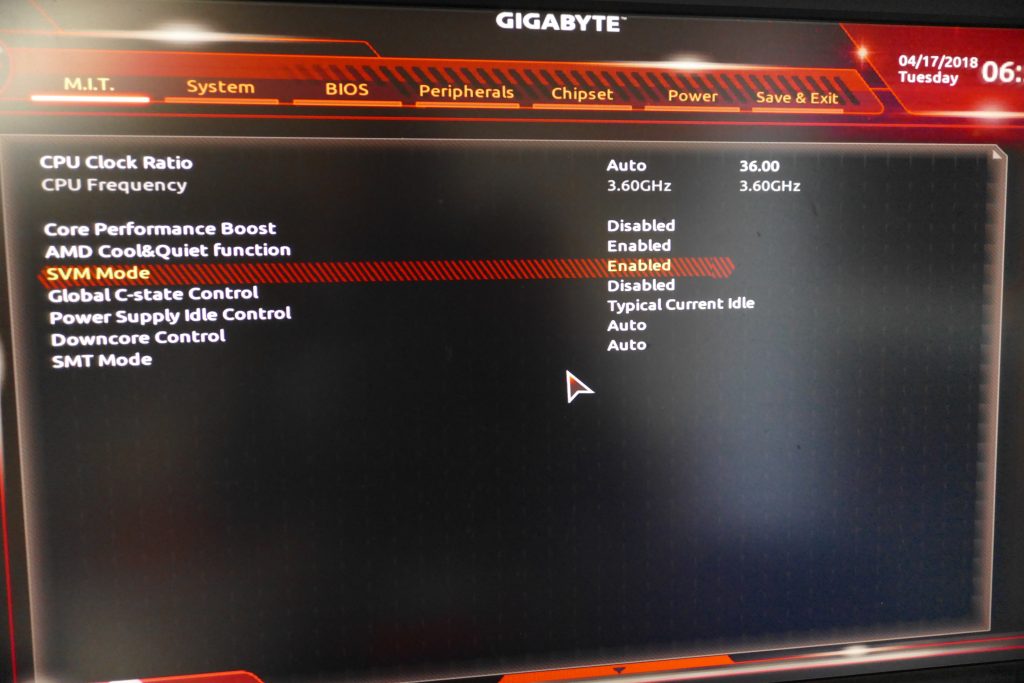
My assumption was, that something was messed up in the BIOS, out of standards or whatever. So I disabled everything suspicious. Global C-State, IOMMU, dynamic overclocking, etc. Then I added iommu=soft to the kernel boot parameters.

For the time being the time being the freezes disappeared and everything works. Give it a try, maybe you suffer from crappy Gigabyte products as well!

Edit:
Contrairy to the first picture above, enabling SVM mode on the Gigabyte still produces some lockups. So disable it.
Additionally, use the recent 4.16.1 Kernel (install with ukuu or manually). The 4.16.2 in the repos produces freezes again (for me).
With this setup the only „nasty“ thing that remains is the frequent  boot-up lock. If the system is up, it seems to be working.

Edit 27.04.18:
With recent 4.17 RC2 things improved further. So far only one or two lockups during first kernel load.

Nachdem jetzt alle Domains mit den Zertifikaten von „Let’s Encrypt“ auf SSL laufen, habe ich auch mal das Blog auf HTTPS umgestellt.
Bei älteren Beiträgen kann u.U. noch angezeigt werden, dass einzelne Medien noch über HTTP geladen werden.
Da bin ich jetzt aber zu faul, das alles händisch zu ändern 🙂

Man hört allen Orten, dass mit dem Umstieg von XP zu Windows 7 die meisten Capisuite Faxclients für Windows nicht mehr laufen. Zu den bedeutenden Programm muss hier wohl „Lisa Fax“ gezählt werden. Kein Support mehr, nicht lauffähig unter Win 7.
Faxgate ist auch irgendwie nur ein Gebastel, mit Cups Druckertreiber und SSH Callback usw.

Nun will sich ja nun auch nicht jeder auch gleich eine VM installieren um die alten Faxclients laufen zu lassen.
Muss man ja auch nicht. Es geht doch ganz einfach!
Ganz simpel irgendwo ein Verzeichnis angelegt, dieses per Cronjob überwachen lassen und alle PDFs die dort gespeichert werden, werden als Fax in die Faxq eingereiht. Fertig.

#!/bin/bash

#pidfile
PID=/var/lock/sendfax.pid

#faxuser aus /etc/capisuite/fax.conf
users="user1 user2 user3"

#basedir für ausgehende faxe, ohne / am ende
faxbase=/some/dir/fax

#läuft das skript schon? dann ende.
if [[ -e $PID ]]
then
        exit
fi

for user in $users
do
    #alle pdf oder PDF im user dir finden
        faxes=$(find $faxbase/$user -maxdepth 1 -iname *.pdf)

    #was gefunden?
        if [[ $faxes != "" ]]
        then

                touch $PID
                echo "Found FAX for user $user, adding to faxq..."
                #max 20 faxe pro aufruf bearbeiten
                faxnum=1
                for fax in $faxes
        do
            #zielnummer=datei basename
                        target=$(basename $fax .pdf)
            
            #sonderzeichen entfernen
                        target=${target//[!0-9]/}
            
            #fax in die faxq einreihen
                        capisuitefax -q -u $user -d $target $fax

            #eingereihte faxe mit zeitstempel versehen und nach gesendet verschieben
                        mv $fax "$faxbase/$user/gesendet/$target-$(date +%Y%m%d-%H%M).pdf"

            #zähler hochzählen
                        faxnum=$(($faxnum+1))
                        if [[ $faxnum -ge 20 ]]
            then
                                exit 1
                        fi
                done
        
        #pid löschen
                rm $PID
        fi

done
exit 0

If somebody is looking for the alternative Firmware for the Linksys WAP54g accesspoint…

Here it is, HyperWAP 1.0c based on the original 3.04 Firmware

DOWNLOAD

Wer etwas stromparendes für einen Heimserver sucht, der sollte sich mal das Supermicro X10SBA anschauen.
Das Board ist passiv gekühlt und läuft mit der Intel Celeron J1900 CPU, hat also genug Leistung um ohne Probleme die beiden(!) Gbit LAN Ports oder auch die mSATA SSD zu „füttern“.

Ich habe das Board heute mit 2x 2GB DDR3L (wichtig, das Board läuft nur mit L Riegeln, also 1.35V), einer 64GB ADATA mSATA SSD und einer 3.5″ Festplatte in Betrieb genommen. Installiert ist natürlich Linux :).
Als Stromversorgung dient mir eine alte Pico-PSU80 mit ErP Netzteil.
Das Beste zum Schluss:

Im Idlemode, wenn die 3.5″ Platte schläft, hat der _gesamte_ Server einen Stromverbrauch von unter 14W. Wenn die 3.5″ Platte läuft und Daten liefert, dann liegt er bei unter 18W.

Some thoughts on DNS Amplification attacks as mentioned here for example:

http://dnsamplificationattacks.blogspot.de/2014/02/authoritative-name-server-attack.html

On several DNS servers I am responsible for, I have to deal with the exact same problem. Sadly I cannot just lock recursive clients out, as the server is used as primary DNS for customers. Limiting to an ACL does not help either, as the requests are coming from the allowed clients 🙁 Possible a lot of them are infected by malware. Using the rate limit feature of BIND is not helping here, because the queries are distributed across a lot of infected clients and this will not trigger the rate limits.

If you have a problem like this, you can see your DNS server opening a lot (hundreds, sometimes thousands) of connections to the victim DNS and flooding it with bogus A queries for random subdomains.
Using tcpdump this might look like this:

tcpdump: verbose output suppressed, use -v or -vv for full protocol decode
listening on eth1, link-type EN10MB (Ethernet), capture size 65535 bytes
11:26:08.502331 IP XXX.XXX.XXX.XXX.53961 > 114.114.116.135.53: 16075 A? ctefwvwherwd.gosky.chinacache.net. (51)
11:26:08.511161 IP XXX.XXX.XXX.XXX.48204 > 114.114.116.135.53: 59982 A? sfepcrmdwnczgp.gosky.chinacache.net. (53)
11:26:16.504011 IP XXX.XXX.XXX.XXX.64001 > 114.114.116.135.53: 16440 A? ctefwvwherwd.gosky.chinacache.net. (51)
11:26:16.513425 IP XXX.XXX.XXX.XXX.53530 > 114.114.116.135.53: 38553 A? sfepcrmdwnczgp.gosky.chinacache.net. (53)

How can you prevent this attack or soften it as much as possible? Good question, most people seem to manually search for the domain (in this example chinacache.net) and block it using the string-match feature in iptables.
I wrote a little script, that does the same thing, but can be run via CRON and blocks those queries automatically.

What does the script do?
1. It checks if there is an abnormally high number of open connections on port 53 to an IP adress (default: 50)
2. It then uses tcpdump to sample some (default: 10) packets of A? queries to that IP. If the number of queried domains exceeds a threshold (default: 10) of same domains+tld, it adds this domain+tld to a blacklist file (default: /etc/domain_blacklist)
3. It reads all entries of the blacklist file and converts the domain+tld to hex values and prepares and executes an iptables rule to block any queries for that domain

What you need?
iptables,  tcpdump, xxd, awk

The script was hacked quite quick and dirty, so you definetly can simplify some things or solve them much better. But this works for me at this time and I hope some of you will find use for it.
As usual, this comes without any warrany of any kind 🙂 Use at own risk!
If you have own iptables rules in usage, you might want to modify the script to not flush iptables every time it runs.
You could also remove the echo debug outputs or direct outputs to /dev/null (if using cron).

Download: dns.sh.gz
SEE UPDATED VERSION BELOW.

edit:

There are several Bugs in the script.
-threshold not correctly implemented

-what if in the 10 captured packets contain more than 1 different domain?

-maybe more 😀

edit:
The script has been running for about 20h now and so far it has blacklistet several domains from being queried:

chinacache.net
n876.com
9aq.com
bcai007.com
bddns.cn
ve60.com
google176.com
xp88888.com
sf120.com
765uc.com
sf120.com

Update 4.11.2014:
I changed the script a little.
-It is now possible to have domains whitelisted

-You can now choose to block the target(domain) or the source (IP) of the attack

So far everything works quite good for me.
Download updated version: dns.sh_1.gz
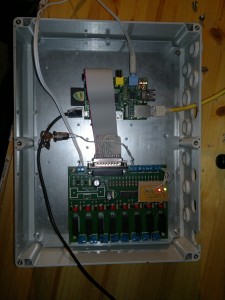
Für eine Alarmanlage habe ich mir bei Pollin die Relaiskarte K8io für den Parallelport bestellt. Nun gibt es leider für den Raspberry Pi keine USB->Paralleladapter, die diesen Namen auch verdienen, also musste gebastelt werden.
Da haben wir dann auch gleich das erste Problem, die parallele Schnittstelle arbeitet mit 5V high Pegeln, der Pi mit 3.3V TTL. Außerdem will ich die Karte mit 12V DC betreiben und nicht mit 9V AC. Wer hat sich denn das einfallen lassen? Wer hat denn irgendwo 9V AC liegen? 😀
Aber wo ein Wille ist, da ist ein Weg! Insofern muss man das Layout der K8io ein wenig modifzieren und dann geht auch das und zwar so:

-Vom Gleichrichter ersparen wir uns D2 und D4, da 12V DC Betrieb. Der + Pol ist dann außen und GND ist innen.
-Außerdem können wir mit dem Spannungsregler 7805 (12V DC -> 5V DC) nichts anfangen. Wir wollen nativ die 3.3V des Pi nutzen. Das spart auch schön Platz, es gibt keinen Kühlkörper mehr 🙂
Nachtrag: Wir erleichtern das Netzteil der K8io auch gleich noch um die beiden 100nf Kondensatoren, dann können wir aus den Resten (7805, Kühlkörper, 2x 100nF) eine kleine Wandlerplatine für den Pi bauen und alles mit 12V betreiben)
Nachtrag 2: Die o.g. Idee ist doch nicht so grandios wie zunächst vermutet. Der Raspi zieht doch recht ordentliche 0.5A max aus dem 7805. Bei 12V DC Betrieb sind das dann 3.5W Wärme Verlustleistung die an dem kleinen Sparkühlkörper verbraten werden müssen. Sprich: Das Teil wird recht heiss. Ich werde daher vermutlich auf ein kleines Schaltnetzteil umrüsten. Die haben idR einen wesentlich besseren Wirkungsgrad und verbraten nicht einfach in Wärme.
Nachtrag 3: Ich habe nun auf Basis des LM2576T-5.0 ein kleines Schaltnetzteil gebaut (u.A. hier vorgestellt). Die 150µH Drossel war nirgends zu bekommen, also musste mit dem ebenfalls dort vorgestellten Tool neu berechnet werden. Dies hat ergeben, dass ich auch eine 100µH Drossel verwenden kann, wenn ich den Kondensator anpasse.
Man merkt deutlich, dass nun der Gesamtaufbau wesentlich weniger Strom aufnimmt. Hatte ich vorher in der Spitze rund 500mA Stromaufnahme, so habe ich mit dem SNT nur noch max. 330mA Stromaufnahme! Und da ist noch ein kleiner NF-Verstärker hinzugekommen. Es lohnt sich also auf jeden Fall, den 7805 auszutauschen. Der Aufbau wird auch nur noch handwarm.

Soviel zu den techn. Änderungen! JP1 lassen wir drin, darüber kommen die 3.3V des Pi aufs Board. Es ginge zwar theoretisch auch ohne die Versorgung über JP1, und man hätte dann einen weiteren Eingang, aber sicher ist sicher.
Weitere Änderungen muss man eigentlich nicht vornehmen. Zu beachten ist, dass über die Pull Up Widerstände immer 3.3V an den Eingängen 1-4 anliegen.
Jetzt muss eigentlich nur noch ein passendes Adapterkabel gebastelt werden. Das geht am einfachsten mit einem 2×13 poligen Pfostenstecker, passendem Flachbandkabel und einem 25 poligen Sub-D Stecker mit Lötkelchen. Gibt es alles für ein paar EUR beim Trödler um die Ecke 😉

Hier ist die genaue Belegung für das Adapterkabel:

GPIO# PIN# Signal LPT PIN
2 3 Ctrl 1
3 5 Ctrl 14
4 7 Ctrl 16
14 8 Select1 10
15 10 Ctrl 17
17 11 Select2 11
18 12 Select3 12
27 13 Select4 13
22 15 Data1 2
23 16 Data2 3
24 18 Data3 4
10 19 Data4 5
9 21 Data5 6
11 23 Data6 7
25 22 Data7 8
8 24 Data8 9
7 26
1 3.3V 15
6 GND 18-25

Die erste Spalte bezeichnet den GPIO Signalname, die zweite Spalte den zugehörigen Pin auf dem Raspi Board (Achtung: Version 2!). Last not least die letzte Spalte die Pins auf dem Sub-D Stecker.

Hat man das dann alles ordentlich verlötet und auf Kurzschlüsse geprüft, kann man anstöpseln und sich mit den entsprechenden Tools austoben 🙂
Wer möchte, kann sich eine kleine Huckepackplatine für die K8io basteln und dann noch die brachliegenden Control Leitungen als weitere Eingänge oder Ausgänge nutzen. Ich habe mir da vier LEDs mit Vorwiderständen auf einen Platinenrest gelötet und realisiere damit Statusanzeigen.

Eingebaut in einem alten Gehäuse kann sich das sehen lassen 🙂


Ich liebe Telefonterror von Marketingtrotteln. Das spornt mich immer dazu an,  etwas an Capisuite herumzubasteln 🙂
Leider fehlt bei Capisuite eine out-of-the-box Blacklistfunktion zum sperren von übermittelten Rufnummern, aber dem kann abgeholfen werden.

Wie auch schon in meinem Beitrag hier erwähnt, kann man dies durch anpassen der incoming.py (wo die Datei liegt steht in der Regel in /etc/capisuite.conf) erreichen. Bei openSUSE liegt die Datei in /usr/lib64/capisuite.

Die Blacklist werten wir am besten in der Funktion callIncoming aus, und zwar NACH dem try/except Block:

# read config file and search for call_to in the user sections
try:
    config=cs_helpers.readConfig()
    userlist=config.sections()
[...]
except IOError,e:
    capisuite.error("Error occured during config file reading: "+e+" Disconnecting...")
    capisuite.reject(call,0x34A9)
    return

Das wäre besagter try/except Block. Hintendran fügen wir ein

if (call_from in (open("/etc/capisuite/blacklist.conf").read().split())):
   capisuite.log("call from blocked number "+call_from+". suppressed.",1,call)
   capisuite.reject(call,0x34A9)
   return

Nun fehlt natürlich noch unsere Liste mit geblockten Nummern, dazu erstellen wir ganz einfach eine Textdatei blacklist.conf im Capisuite ConfigDir /etc/capisuite. Jede Zeile enthält genau eine vollständige Telefonnummer.
Et voilá, betreffende Anrufe werden mit einem Capi Fehler rejected und der nervige Anrufer weiss nicht, wie im geschieht:

Thu Aug  9 10:22:07 2012 Connection 0xa9aed0: call from blocked number 069XXXXXXX. suppressed.

Hihihihi.